Step 1: How to Setup Your Organization Business Number
Income Tax and CRA (Canada Revenue Agency)
Canada Revenue Agency (CRA) expects all childcare organizations to issue income tax receipts to the parents/guardians of the child(ren) in their care. By law (CRA) all receipts must be issued on or before the last day in February of every year.
Receipts issued should include all the following information: Name of fee payer, the name of the child(ren), the amount received as claimable childcare services for each child, the period that the services were delivered (start date, end date), the name, address, business number, date of the receipt and a representative’s signature of the organization.
Each receipt should carry a unique number. Childcarepro® has released the new income tax engine to provide the user with the tools to prepare accurate receipts for the families. If this is the first time to use the Income Tax Engine, the user will need to do complete the Setup. Only then, will the user be able to generate, review and publish the receipts. Below is the step so follow to complete the setup and process the receipts.
How to Setup a Business Number
For the user to generate the information on the tax receipts, the user must enter the
business number of the organization.
- 1. Left Menu > Setup
- 2. Select – Organization
- 3. Select – General Information
- 4. Under “Business Number “– enter the organization’s business number
- 5. Click the Save Icon located at the top of the screen – to save all changes
Step 2: How to Setup a Tax Receipt Number
IMPORTANT: This Step only needs to be done once. If you have run Tax Receipts in the
past, please move on to:
“Step 4: Income Taxes: How to Create an Income Tax Receipt Batch”
The user will setup the naming convention for their tax receipt – (i.e. TR, the sequence
000001.
With this setup the user will indicate the first number,
- Next Value (first number on the receipt)
- Value Prefix (if you wish to create a distinct receipt number i.e. TR, enter TR),
- Value Suffix (same concept as Value Prefix however, Lettering will appear after the
number), - Value Incremental (is the sequence of incrementing the value of the Next Value
i.e., if I start with 1 the next value would be 2), - Padded Length (indicates number of zeros before the actual receipt number i.e.
TR000001 total padded value would be 8), - Preview Number (allows the user to view an example to the tax receipt number).
- NOTE: This information may be reset every year.
How to Setup a Tax Receipt Number
FIRST STEP:
- Left Menu > Setup
- System >Number Sequences
- Name – Tax Receipt Number
- Next Value – 1
- Value Prefix – TR
- Value Suffix –
- Value Increment – Should be set to 1
- Padded Length – 8
- Preview Number – Will show you what your format would look like
- Click the Save Icon: to Save all changes
NEXT STEP: map out the number sequence.
- Click the “+” icon: Add Number Sequence Mapping
- Type – Childcare Tax Receipt Number Sequence
- Select the number sequence.
- Number Sequence – Select Income Tax Receipt
- Click the checkmark ✓ icon: to Save and return to previous screen
Step 3: How to Setup a Tax Receipt Batch
IMPORTANT: This step only needs to be done once. If you have processed Tax Receipts in CCP MAX in
the past, please move on to:
“Step 4: Income Taxes: How to Create an Income Tax Receipt Batch”
Using the Tax Engine, the user may create several batches for the tax year. With this
flexibility, the user may issue taxes by locations, for a select few parents, etc. This means
the user will issue taxes in batches and can name each batch similar to what was done in
the receipt number.
How to Setup a Tax Receipt Batch
FIRST STEP:
- Left Menu > Setup > System.
- Number Sequences > Tax Receipt Batch
- Complete each of the following:
a. Name
b. Next Value – first number for your batch
c. Value Prefix – (i.e., TRB (Tax Receipt Batch)
d. Value Increment – 1 for increase by 1
e. Padded Length: number of zeros after value prefix and before number
f. Preview Number – Will show you what your format would look like - Click the Save Icon: to Save
NEXT STEP: map out the Batch Number sequence.
- Click the “+” icon: Add Number Sequence Mapping
a. Type – Childcare Tax Receipt Batch Number
b. Number Sequence – Select Tax Submission - Click the checkmark icon ✓: to save and return to the previous screen.
Step 4: How to Create an Income Tax Receipt Batch
STEPS:
In your left menu:
- Select Accounts Receivable
- Select Tax Receipts
- Select Tax Receipt Batch
- Click “+” icon: Add Tax Receipt Batch
- Taxation Year – Enter in the tax year (i.e., 2022).
- off (press your tab key on keyboard).
- Location – from the drop-down list – choose the location.
- Click the “+” icon: Add Receipts – (Note – It will indicate the number of
receipts available). - Click checkbox to select the tax receipts to be issued.
- Click on the checkmark icon ✓: to accept and move to next screen.
- In the Tax Receipts grid, the system will display all tax receipts selected for this
batch.
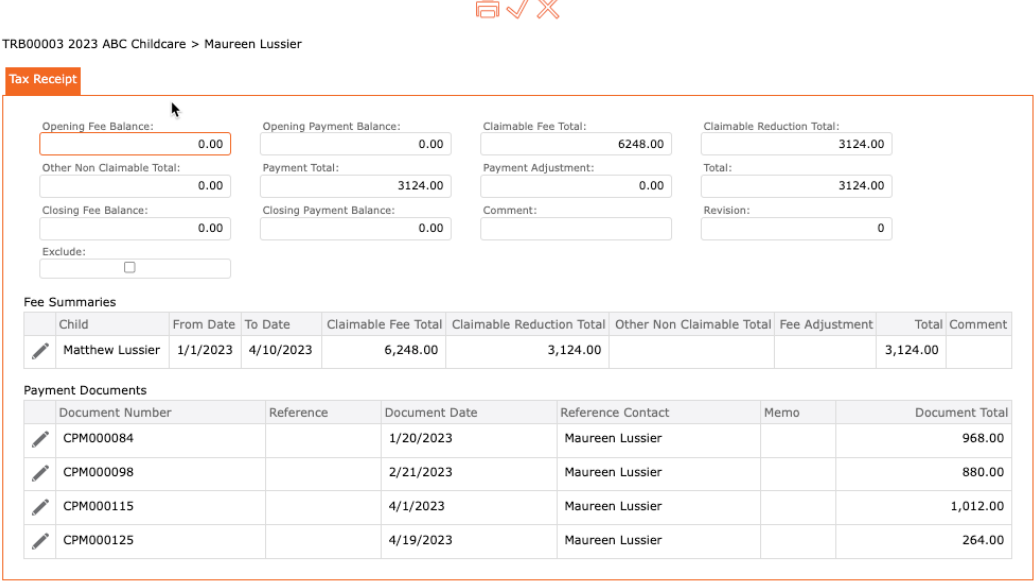
Step 5: How to Review the Tax Receipt(s)
Prior to printing the tax receipts the user should review the calculations to ensure the
information presented on the tax receipt is accurate.
View Payers receipt Details
- Tax Receipt Claimable Fee Total
- Claimable Fee Total – Total Claimable fees for the tax year. Cannot edit.
- Claimable Reduction Total – Total fees reduced by third party payor
(subsidy, affordability grant or CWELLC). Cannot edit . - Other Non-Claimable Total – Total non-claimable fees for the tax year,
example NSF. Cannot edit. - Payment Total – Total Payments received for the tax year. Cannot Edit.
- Payment Adjustment – Adjustment for payments, example payments from
legacy AR system. Can Edit. - Total – Tax receipt total.
- Comment – Note to be displayed on the receipt. Can Edit.
- Exclude – Do not print receipt in the batch run.
- Fee Summaries (break down per child)
- Select the pencil.
- The user cannot update Claimable tax reduction, Claimable
Reduction and Other non-claimable total. - The user can update the Fee adjustment. This will either increase
or decrease the tax receipt if the user enters a positive or
negative value. - Total will display the adjusted claimable fee total.
- Comment will allow the user to indicate the update made.
Example Opening balance from previous system.
- The user cannot update Claimable tax reduction, Claimable
- Click the checkmark icon ✓: to accept and return to previous screen.
- Click the Save Icon: To save all changes.
- Select the pencil.
- Payment Documents
- Lists all payments received in the tax year.
- The user can edit the payment to view the details.
Additional Notes:
Errors you may receive:
“PLEASE CORRECT THE ERRORS BELOW THEN TRY AGAIN –
Tax receipt summary, total, “Parent Name” must be 0”
If you the user created a manual credit or invoice, to someone other than a child, the use will need
to adjust to zero (0) and then create the adjustment to a child.
Step 6: How to Preview and Publish a Batch of Tax Receipts
Once the user has reviewed the tax receipts in the batch, the user will then publish the
batch of receipts.
A Batch Number will be created, and the batch will indicate the total number of receipts in
the batch.
STEPS:
- Left Menu > Accounts Receivable
- Select Tax Receipts
- Select Publish Tax Receipts
a. Batch – from drop-down list – Select Batch Number
b. If the user leaves the preview mode on, the user can view before
publishing.
c. Once the user is ready to publish - Select the publish date.
- Select Send on Demand Alert
- Select the Tax Receipt Alert
- Select the Edit Template should the user want to update the email going out to
the parent. - Select Publish
a. The tax receipt will be emailed to the payor.
To Note:
Excluding specific tax receipts from batch:
Once a tax receipt batch has been processed, you cannot exclude specific receipts from
being sent out, as they are part of the batch.
To ensure accuracy, review your batch before processing. During this stage, when tax
receipts still have a checkbox next to them (instead of the edit pencil icon), you can remove
any receipts you do not want to include. Then, proceed with processing only the receipts
you intend to publish.
Once published, you can create a new batch, which will include any receipts that were
deleted from the previous batch and not yet processed.
Tax Receipts showing a zero dollar amount:
If a contact’s tax receipt shows a zero-dollar amount (and this is correct), it is best practice
to keep these receipts as part of the batch. This ensures a smoother process for the next
year’s income tax filing.
Otherwise, the system will flag the account, indicating that the previous year’s tax receipts
were incomplete. As a result, you will not be able to move forward until they have been
processed.
ADDTIONNAL RESOURCES:
How to Setup Customer Items
IMPORTANT: This section is part of your Initial Setup. These steps can be followed should
you need to correct any customer items.
To show the correct amounts of taxable child benefits, the user must specify which customer items should appear on the Income Tax Receipt. This means adding extra details to each item.
Note – for new users, this will be part of your initial setup when creating your items. For
those users who have already created all items, all customer items have been defaulted to
Fee and Fee Reduction. If a customer item was associated to a childcare service, we have
assumed that it is a Fee. Anything related to Subsidy we have assumed that it is a fee
reduction.
Please review the Customer Prices report to see default Customer Item and its associated
Fee and Fee Reduction. Proceed to update all Customer Item to reflect the correct
information pertaining to Income Tax reporting.
STEPS:
- Left Menu >Setup.
- Select: Accounting > Item
- Click the “edit pencil” to edit the rate(s) to be included in the tax calculations.
a. Note – CRA has specific guidelines on what can be included – if you are
unsure, contact your accountant or CRA for guidance. - Click the down arrow in field Update the Tax Receipt Item Type – three options
display:
a. Not applicable (refers to selected fees that are not included on the tax
receipt i.e., NSF, and subsidy fees)
b. Fee (refers to all fees to be included on your tax receipt)
c. Fee Reduction (refers to fees that reduce the childcare fees – i.e. Subsidy
Payment, CWELCC Payment, Affordability Grant Payment, that reduce
the parents fees due etc.) - Select the Save Icon located at the top of the screen: to save all changes.
- Repeat for all customer items.
Note – The system defaults all items related to services as Fee, and all subsidy and grants
Fee Reduction) . The tax receipt will automatically calculate all “Fee” less “Fee Reduction” less “Not applicable”
fees.
How to View Published Tax Receipts on the Payer’s Receivable Account
- Left Menu > Contact.
- Contact Finder > type the contact’s name.
- Click the edit pencil icon to: Edit.
- Select the Tab – Finance
- Select the Tab – Receivable
- Select the Tab – Tax receipts.
a. All tax receipts will be listed.
i. Select the edit pencil to: Edit.
ii. Select Print to create the receipt again
b. To Print – Select Your Printer in the destination field
c. To Save – Select Save as PDF (be sure to correctly name the PDF file and save it under the correct folder on your computer)
How to Void an Issued Income Tax Receipt
If you, the user needs to update the tax receipt after it has been published, you can void
the original receipt, make corrections, and generate a new tax receipt.
How to Void a Tax Receipt.
- Left Menu > Contact > Contact Finder > type name of payer
- Click edit pencil icon: Edit the payer information
- Click Finance Tab
- Click Receivables Tab
- Click Tax Receipts Sub-Tab
- Click the edit pencil icon: Tax Receipts to view details
- Click the edit pencil icon: to the left of the Tax Receipt to void
- Click the Void Button on the Top Toolbar
a. message will display asking the user to confirm Void the Receipt
b. Click Yes to Void - The Void icon will display on the Top Toolbar
- The Grid will now display that this receipt is now Voided –
Note – On a payer account, when viewing a Tax Receipt, all voided receipts will display in
the grid.
There could be a time that you have missed a payment or an invoice in the previous tax
year and you only realize after you have published your tax receipt.
If you try to post/void the payment or invoice, you will now receive an error if you have
published a tax receipt in the post-dated year.
How to Adjust a Previous Year and Generate a New Income Tax Receipt
You the user may proceed to adjust the payer account by creating new invoices and/or
payments. You must ensure the dates are prior to the year end and NOT in the current
year. Once the invoices and payments have been created, you may now issue a new
tax receipt to replace the voided receipt.
Finding and issuing a replacement Tax Receipt for the previous year
- Left Menu > Accounts Receivable > Tax Receipts > Tax Receipt Batch (displays Tax
Receipt Batch Finder) - Click “+” icon: Add Tax Receipt Batch
- Enter Year then TAB off by clicking the tab button on your keyboard.
- Select the Location from the dropdown list – then TAB off by clicking the tab button on
your keyboard - The software will display that a new tax receipt is required for the modified payor.
- Click the “+” icon:
- Click Add Tax Receipt
- In the Grid – Tax Receipt Batch, Allan Anderson, a new column displays this as a
Revision. - Display all the additional fields in the revised tax receipt.
- Click Edit pencil icon to view the details of the revised tax receipt
- Previous Excess Payment Total – If the payer made additional payments the
previous tax year, it would now display the amount in this area. - Excess Payment Total – If the payer made additional payments this tax year, it
would now display in this area. - Revision – Will display the revised number.
- Click the checkmark icon at the top of the screen to save and return to previous screen.
- Click the Save Icon to Save All.
- Once saved the new tax receipt can be published. The updated tax receipt will now be
listed on the payers file under Receivables > sub-tab Tax Receipts > Tax
Receipts. Updated Tax Receipt will display on the Guardian Portal (under development).
How to Print a Tax Receipt or Save it as a PDF.
There is now an option to print a PDF version in the Income Tax Engine. The user can edit
the income tax batch they want to print or save as PDF by selecting the print button in the
selected batch.
This opens the PDF in a new tab, where the user can print or save.
IMPORTANT NOTE: Submitting Your Signature to CCP
Please note that all clients are requested to submit their digital signature to their CCP Team
Member. This signature will be uploaded into the system and will be ready to be printed
onto your Tax Receipts.
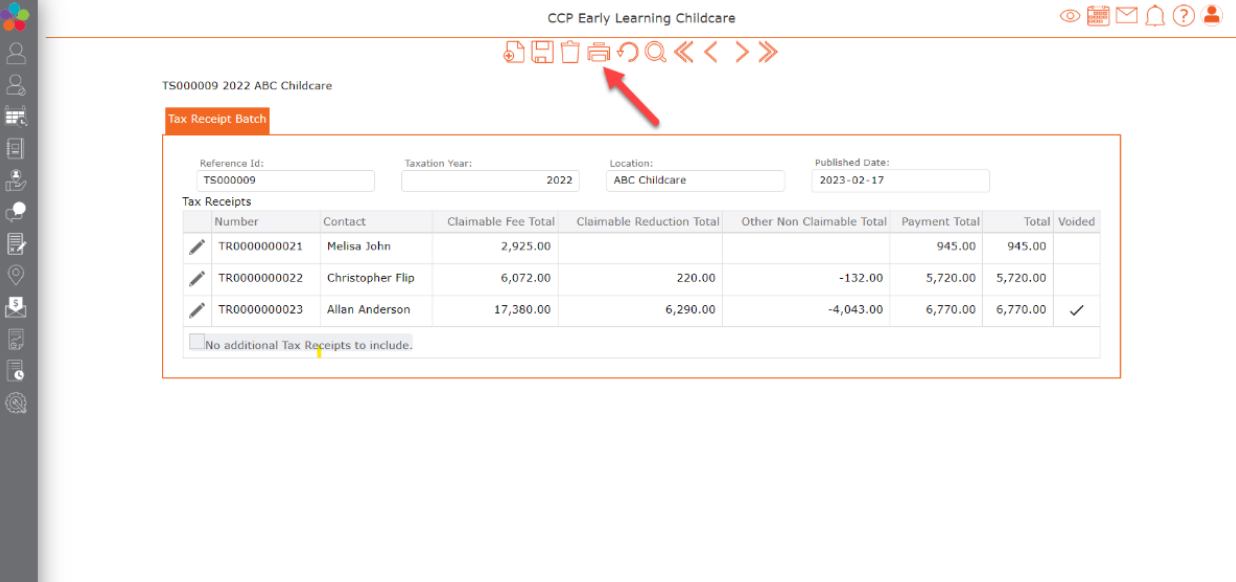
Breakdown – Tax Receipt Page – Access
How to access:
Accounts Receivable> Tax Receipts> Tax Receipt Batch
Select Taxation year and Location> click GO
To view, click on the edit pencil to the left of the Reference ID
Displayed:
- Reference ID
- Taxation Year
- Location
- Published Date
o NOTE: no adjustments can be made once published. Best practice is to
review all income tax receipts before publishing.
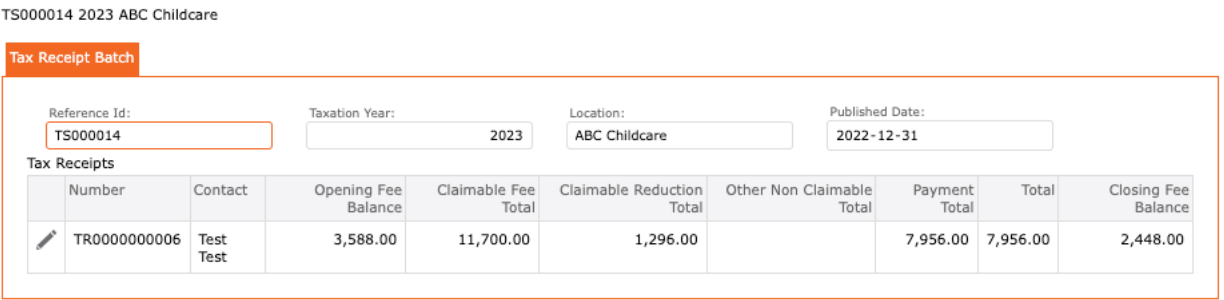
Breakdown – Tax Receipt Page – how to read what is displayed.
Tax Receipt Page summary:
Click on the edit pencil to the left of the Tax Receipt Batch/ Column “Number”.
Tax Receipt Page Breakdown:
- Number: Income Tax Receipt Number
- Opening Fee Balance: Fee balance that is carried over from the previous tax year.
- Opening Payment Balance: Payment balance that is carried over from the
previous tax year. - Claimable Fee Total: Total fees that can be claimed.
- Claimable Reduction Total: Fees that reduced childcare costs (example: subsidy,
grants) for the current tax year. - Other Non-Claimable Total: Fees that cannot be claimed (example: NSF charges,
snack fees, etc.) - Payment Total: Total Payments Received
- Payment Adjustment: Adjustments for payments missed, not previously recorded.
- Total: Total amount displayed on tax receipt.
- Closing Fee Balance: Fee balance as of Dec 31 current tax year.
- Closing Payment Balance: Payments balance as of Dec 31 of current tax year.
Calculation of the tax receipt total: Net of the receipt is the payment total less the non-claimable total, unless the closing fee balance is higher than the payment total.
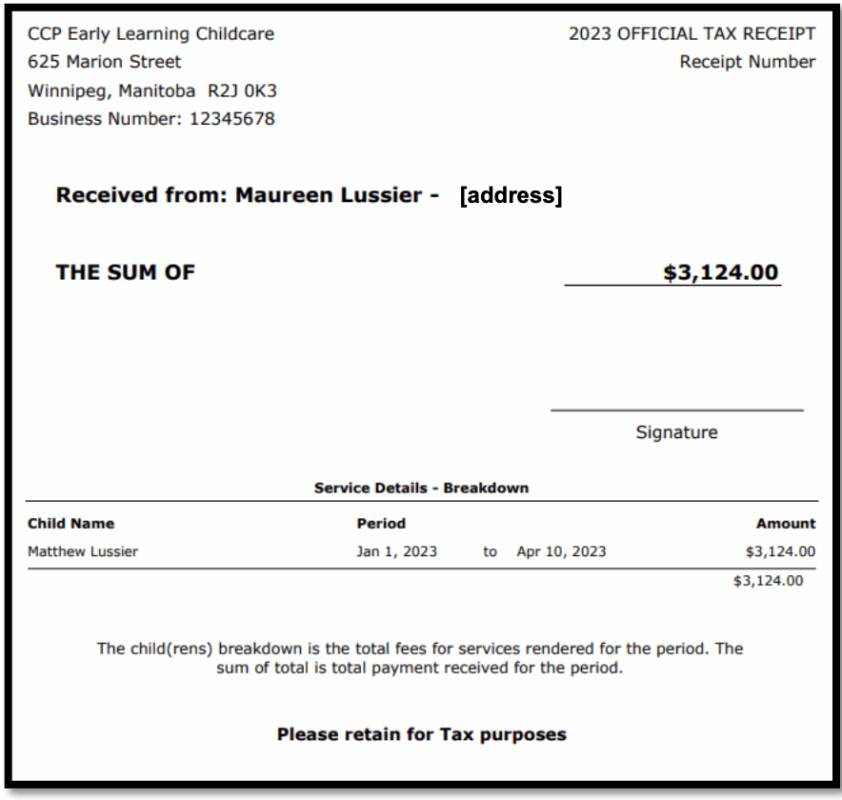
Tax Receipt – information displayed breakdown
To view income tax receipt:
Click on the “print” icon found at the top of the screen.
NOTE: Every receipt for childcare expenses is made out to the individual who paid the child
care expenses. The receipts show the total cost of care and then a breakdown of the fees.
Your accountant can choose how to break up the tax credit.
Displayed:
- Organization Name and address
- Current Year
- Receipt Number
- Received from: Name from payer and address
- The Sum of: Total claimable payments received from payer
- Signature: Organization Representative’s signature
- Service Details – Breakdown:
o Child Name: Child’s name of services paid for by payer
o Period: Service rendered start and end date
o Amount: Total Claimable Fee total minus Claimable Reduction Total
Tax Receipt – Emailing Tax Receipts
Emailing Tax Receipts Batch:
Tax Receipts are emailed out when you select the “Send On Demand Alerts” when
publishing.
Emailing Individual Tax Receipts:
Once your receipts have been published, and you wish to re-send or email or just one
receipt. You can go into the payer’s account and email from there.
Steps to Follow:
- Go to Contacts and search for payer
- Select Payer’s Name
- Click on the “Finance” tab
- Click on the “Receivables” tab
- Click on the “Tax Receipts” tab
- Select the “Email” icon to the right of the Tax Receipt you wish to
email - Choose the Email category from the drop down list, tab off
- Click the “NEXT” button below the “email body”
- Click SEND to email out
- Click on the “Receivables” tab
Emails bounce back/ notifications:
- Emails notifications and bounce backs will appear in the inbox belonging to the email
set up in your organization.
Email Reports/ Audit:
The “Outgoing Email” report provides information about emails sent out.
To access:
- Reports
- Operations
▪ Audit
▪ Outgoing Emails
- Operations
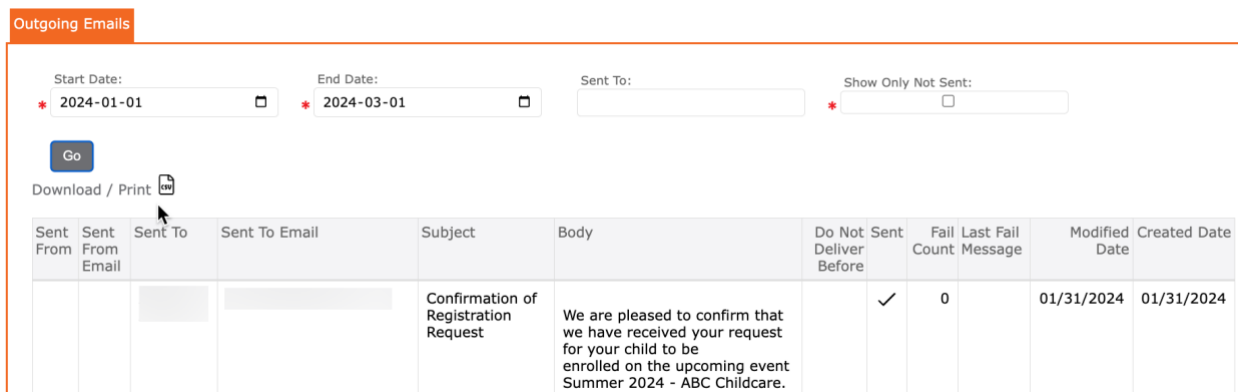
Information displayed:
- Sent From: Your organization’s Name
- Sent From Email: Your organization’s email
- Sent to: Contact’s Name
- Sent to email: Contact’s email
- Subject: Email subject title
- Body: Content sent in email.
- Do Not Deliver Before: pre-set date.
- Sent: checkmark = email has been sent
- Fail Count: displays a number representing number of failed outgoing emails
- Last Fail Message: Message describing the failure.
- Created Date: The date that the email was sent out.