Customer Items
Before the user can start invoicing, the user must set up the customer items (rates) associated to each type of service available at your organization and at each of your locations. The types of services include services and revenues generated from parents, from subsidy, from discounts, etc. The Customer Item Finder stores information that allows the user to setup the Group – type of Services rendered i.e. Childcare, Camps, Events, etc, Financial Account, Tax implications, and whether this revenue group is to be included on the Income Tax Receipt at the end of the year.
Types of Customer Items
- Parent fees by age group and by daily, monthly, period, weekly camps fees, etc.
- Subsidy Approval Rates by Subsidy Provider
- Grants
- Discount rates
- Camp Rates
- Event Rates
- Workshop Rates
Note: When receiving the newly set up Database, you will notice that examples of Customer Items that are set up. Please note the Subsidy Payments, Subsidy Contributions below.
If you are not using Subsidy, this note does not apply, and you can discontinue the above-mentioned Items.
Every customer item is associated to a financial account.
Here is a list of Customer Items setup by default in the database. The user can edit from the current list as well as add new items.
- 4000 Childcare Fees
- 4100 Subsidy Fees
- 4500 Conference Fees
- 4200 Transportation Fees
- 4300 Other Fees
- 4400 Camp Fees
- 4110 Subsidy Payer Contribution
- 4010 Subsidy Offset Difference
- 4900 Discount
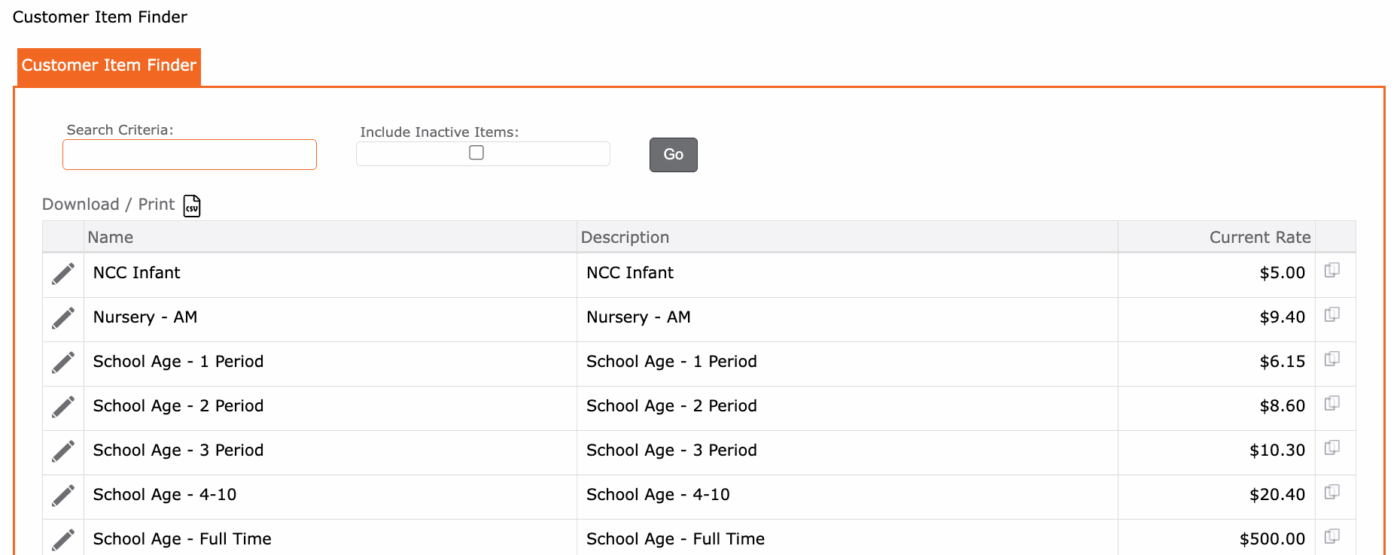
View Customer Item Finder
1. Setup > Accounting > Customer Item
2. Customer Item Finder Displays
3. Enter Customer Item Name, Search Criteria (to narrow the list) if left blank will display all items
4. Click Customer Item Finder Grid displays all the available Customer Items
NOTE – Subsidy Approval Rates need to be added to your Customer Item listing. A good naming search convention for subsidy items is to include “Sub”. This would allow the user to search for all items which include “Sub” as part of the name. If the user has more than one Subsidy Provider, including the name of the Subsidy Provider could also be helpful to quickly search and identify the provider when displaying the list of available items. ****Grants need to be added to the Customer Items.
How to Add a Customer Item
1. Setup > Accounting > Item>
2. Click the “+” Item
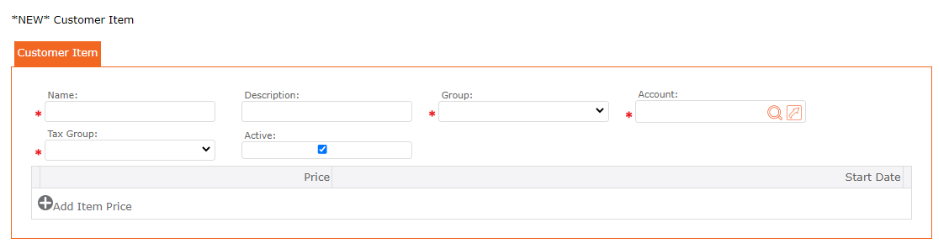
3. Complete the form – Name the Customer Item
4. Description (can be same as the Customer Item )
5. Group (category of expense i.e. Childcare, Camps, etc.)
6. Tax Receipt Item Type: Choose from the Drop-down list
8. Account – identify the account number where the revenues will be recorded
9. Tax Group (taxable or non-taxable)
10. Active
11. Click the Save icon from the Maintenance Toolbar
12. Click “+” Add Item Price
13. Results – The user’s new Item displays in the Grid
History and Date Range for a Customer Item
The system allows the organization to update rates over time.
- Rates are date-sensitive, with a start date and an end date.
- If no end date is entered, the system uses an infinity date by default.
- To change a rate, the user must update the current rate’s end date and create a new rate for the new time period.
Users will be notified when a rate expires, and all expired rates will be shown in the History tab.
New rates can be added at any time, and they will take effect starting from their assigned start date.
This feature keeps a full record of rate changes over time.
Edit a Customer Item
At the end of the year, the user must generate Income Tax Receipts for parents who paid for childcare services.
When generating receipts, the user selects the appropriate Accounts, and the system will automatically include the relevant information on the Income Tax Receipt, which is then emailed to parents.
To prepare for this, the user should track all services provided and payments received throughout the year.
There are 3 Tax Receipt Item types. They are:
• Fee – If choosing Fee, the amount will be included in the Tax Receipt. I.E. Childcare Fees
• Fee Reduction – If choosing Fee Reduction, these fees reduce the Childcare Fees I.E. Subsidy, Grants, discounts.
• Not Applicable – If choosing Not Applicable, these fees are related to fees directly related to the fee payer. I.E. NSF, Transportation, Lunch Fees, etc.
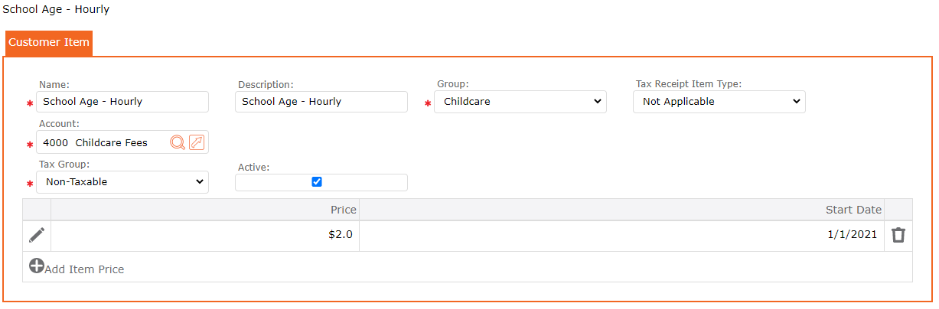
Once the user has created a Customer Item, these will display in a Grid. To enter the price, the user will edit the Item and insert the price. When opening the screen, edit Customer Item, you will be able to identify if the Item should be included in the Tax Receipt and you will be able to add a price to the Item.
1. Setup > Accounting > Item
2. Click the edit pencil icon to Edit to the Item
3. Enter Price
4. Enter Start Date
6. Click the checkmark icon to apply and return to the Maintenance Form
7. Click the SAVE icon save all updates
BEST PRACTICE – For Other Items, such as Snack Fees, Transportation Fees, etc.
When creating these non childcare fee items, it is important that they are set to:
- Group = Other
- Tax Receipt Item type = Not Applicable
It is recommended to set up the snack fee as a daily item and service. This allows invoicing to align with the specific days a child is scheduled to attend, and it simplifies billing if a child transitions from one site to another.
If your organization bills a flat monthly rate regardless of the number of attendance/scheduled days, the fee can be configured as a monthly charge (billing rate type = monthly). Please note, however, that if a child transfers between locations mid-month and site-level tracking is required, manual billing adjustments will be necessary.
How to Add Subsidy Rates to a Subsidy Provider
Before you can add Subsidy Rates on the Subsidy Provider, the subsidy rates must be added as an Item.
To view the list of items:
1. Setup > Accounting > Item
2. Item Grid will display
3. To narrow down and only see the Subsidy Items, use the Item Finder by entering SUB
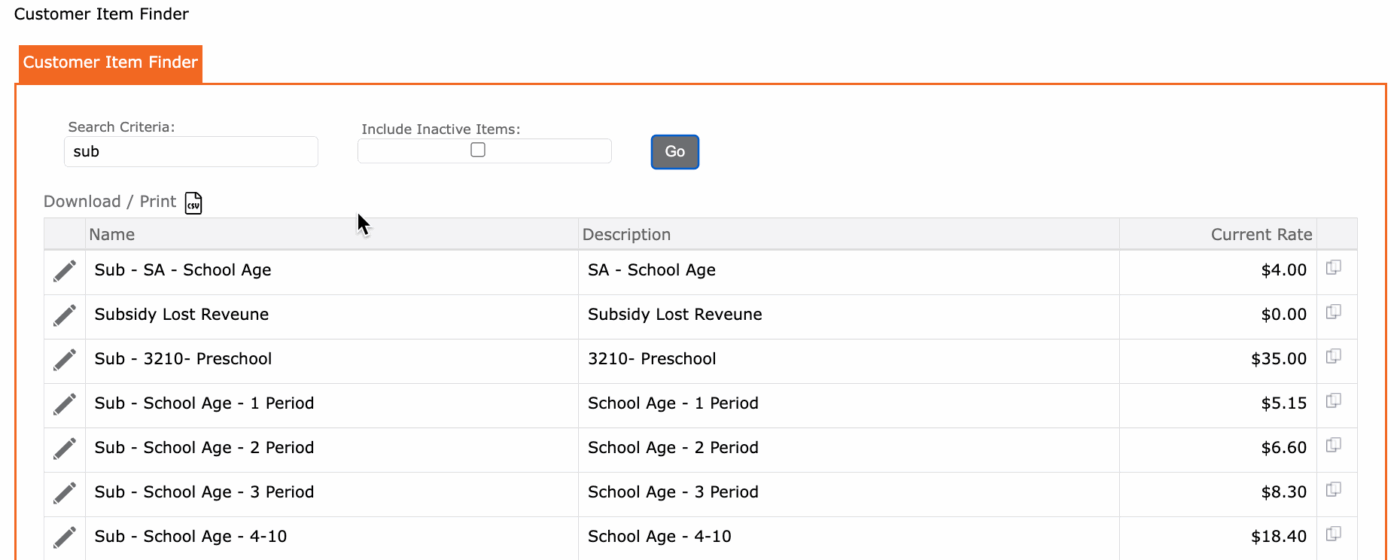
Note: if there are no Subsidy Item in your list, these were not set up in the Setup > Accounting > Item.