Creating an event (camp) for a location.
•In many Provinces, many organizations offer winter, spring, and summer camps for School Age children. As well, Professional Development days where parents can opt in or out of childcare on these days. All these types of fees would be set up as events. Payment can be done at the time of registration or registration would be reviewed and invoices issued after acceptance in the event.
•Events services include Camps, Conferences or Workshops. Different than childcare services, events are for shorter period – one day, a few hours or a week. All Events will be setup to include minimum and maximum number of participants, waitlist limits, age group, and whether it will be available on the portal.
•By setting up all services at the organization level, the services will be tagged at the location or home if these are being offered.
•In setting up services, the user will create the service, assign an age group, tag a price. These event type services are tagged to a location where parents can register their children for the additional services.
- Left Menu > Select Setup
- Select Organization
- Top menu tabs > Select Locations:
- Centers = Select your Location by clicking the Edit Pencil beside the Location Name.
- Top menu tabs > Select Services:
- Select “Events”
- Under “Camps”:
- Click “+” Add Location Event
- Add Services > Events > Camps
- Click Events Tab
- Click “+” Add Event Service
- To add a new Camp > scroll down to bottom
- Click “+” Add Organization Camp Event
- Enter information in the fields displayed:
- Name (Camp Name)
- Description
- Age Group
- Display Cost on Portal
- Refundable Registration Item
- Waitlist Limit
- Registration Instructions
- Discontinued (for future use when no longer offered)
- Consents (click the edit pencil to select the consents needed for this event)
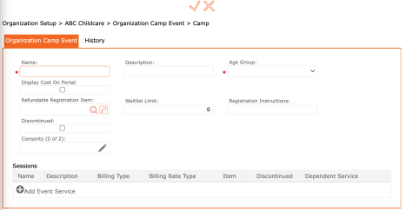
- Add a Session:
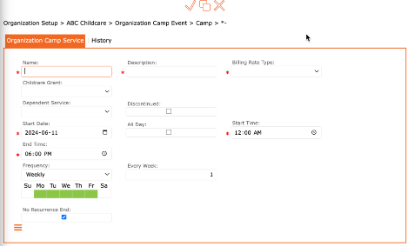
- Click “+” Add Event Service
- Enter Name of Session,
- Enter Description,
- Billing Rate Type – choose from the drop-down,
- Childcare Grant – choose from the drop-down (CWELLC and Affordability Grant),
- Dependent Service,
- Discontinued (for future use when service no longer offered),
- Start Date – pick from the Calendar,
- All day (if offered all day)
- Start Time – pick from the Clock,
- End Time – pick from the Clock,
- Frequency – choose from the drop-down,
- Every Week – enter the number of weeks,
- Select the days of the week (green = service offered)
- Click the ✓ checkmark icon at the top of the screen to save and return to previous screen.
- Review all information displayed on screen.
- Click the ✓ checkmark icon at the top of the screen to save and return to previous screen.
Note – If more than one session on this event, repeat the steps in section “f”.
The session can also be duplicated by clicking the clone icon found at the top of the page. Once the session is cloned, be sure to make all the necessary edits.
Your new Camp/ Event should now be displayed on the “Organization Camp Event” Page.
To make any changes – click the edit pencil icon located to the left of the Camp.
IMPORTANT: Be sure to save all changes and updates by clicking the SAVE icon.